Tuesday 30 April 2013

tasty tuesday: decadent chocolate torte with salted caramel whipped cream and caramel drizzle


Oh my word.

This cake is decadence defined.
Rich, smooth, chocolatey goodness awaits you my friends!  


My dear friend Eryn and I have a wonderful tradition of getting together and baking something crazy.  We were on a cupcake kick for a long time, but this time we decided to make chocolate tortes!  Truthfully, I had no idea what a torte actually was before we made it.  I knew they were flourless, but that was about it!  So, we chose to make a chocolate torte...and then top it with salted caramel whipped cream (and a caramel drizzle to boot), because why not combine all of our favorite things into one dessert!  

Chocolate Torte

Ingredients:
1 cup Water
3/4 cup Sugar

1/2 cup + 1 tbsp Butter (diced)
18 ounces Bittersweet (not unsweetened) or Semisweet Chocolate (chopped)
6 Eggs

Directions:
1) Butter a 10-inch-diameter spring form pan (or several mini spring form pans...we used several 4-inch pans, and adjusted the cooking times), and wrap 3 layers of heavy duty foil around the top of the pan (this will be to keep water from leaking into the pan!).
2) In a small saucepan, bring the water and sugar to a boil over medium heat, stirring until the sugar has dissolved. Simmer for about 5 minutes, and then remove from heat.
3) Melt the butter in a large saucepan over low heat. Then, add your chocolate and whisk until smooth.
4) Whisk the sugar syrup into the chocolate mixture, and cool slightly.
5) Add the eggs to the chocolate mixture, whisking until it is well blended (*it's important that your chocolate mixture is cool enough that it doesn't start cooking the eggs!).
6)  Place the cake pan in a large baking dish, and add enough hot water to the baking dish so that it comes halfway up the sides of the cake pan.
7)  Bake at 350 degrees, until the center no longer moves when the pan is gently shaken. About 50 minutes for a 10-inch pan (and approximately 40 minutes for smaller pans....although this will depend on how thick you make them. We baked ours at 10 minute intervals, checking the middle each time to see if they were getting close to being done!).
8)  Carefully remove the pan from the water bath, and cool completely in the spring-form pan.

Salted Caramel Drizzle + Whipped Cream

For the Caramel:
1/2 cup Sugar
3 tbsp Butter (cubed)
1/4 cup heavy Cream

1)  First, make sure everything is measured out and ready to go.  Making caramel isn't too tricky, but being well-prepared is key!
2)  In a medium saucepan, heat your sugar over a medium-high heat, stirring constantly (you can add a teeny bit of water here to help out if you want...however, your caramel won't be quite as creamy!).
3)  Make sure to keep stirring the entire time, otherwise you might get chunks of unmelted sugar.
4)  Keep cooking the sugar until it turns a nice golden brown and is all dissolved.  Then, add your butter and keep stirring like mad!  *It's going to bubble a lot...don't be afraid!
5)  Turn the heat off, keep stirring, and add in your cream once the butter has all melted.
6)  Continue stirring and remove from heat.  
7)  The hardest part is letting it cool.  I usually stick my pot in the fridge...because I'm impatient like that.

For the Salted Caramel Whipped Cream:
4 tbsp of Caramel
1/2 tsp Salt (or to taste!)
1 cup heavy Cream

1)  Whip your cream (until it has soft or stiff peaks...you choose!).
2)  Then add in your caramel and salt to taste...the measurements are really just a rough guideline!

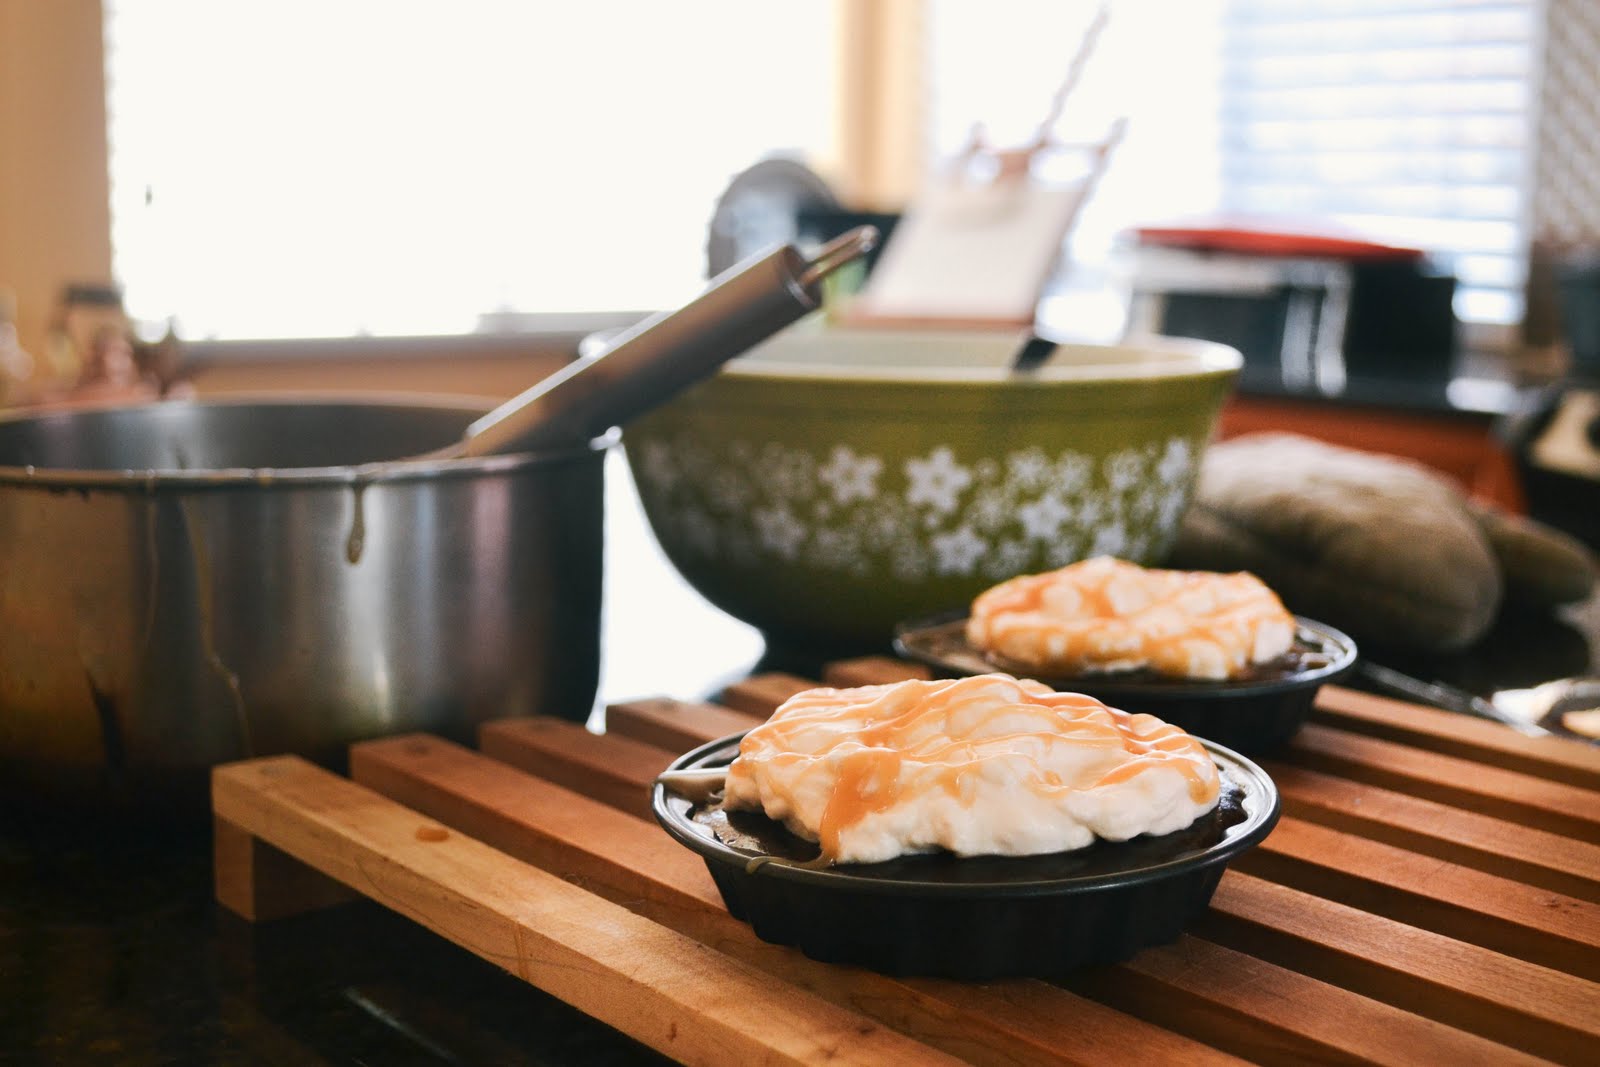
Now, use this to top off your tortes right before you serve them!


Yep, this cake is mostly chocolate.  Need I say more?


It's super important to make sure that your tinfoil is wrapped nice and tight around your pan(s), as you don't want any water leaking through!


Making caramel can be scary the first time you do it, but once you do...you'll never look back!
And I can't wait to try this torte with different variations of whipped cream and sauces.  I currently have my heart set on a beautiful raspberry whipped cream and raspberry sauce....mmmhhh.


Me and Eryn!


Tortes are a wonderful option for those allergic to gluten, as well as anyone who loves delicious things.
Just sayin', you should probably go make this now.


p.s.   kelsey

Monday 29 April 2013

weekly wrap-up: .....and the weather in edmonton is...

Okay, so first of all, our sincere apologies to our readers for not posting anything this past weekend! Between the three of us, we have been ridiculously busy and have been finishing finals, packing, moving, getting ready to travel overseas, and celebrating the end of school :)

So here's a short wrap-up of my past week, which consisted of nacho celebrations of finishing the last exam of my undergraduate degree (WOOO!!), meeting up with lovely friends, purchasing some books to read for my flight to Korea, getting my gorgeous bumblebee laptop sleeve in the mail from Etsy (so that I can bring my new laptop to Korea!), and lastly...enjoying this outside my window today. That's right, more snow... surprise, surprise. On the upside, the weather in Korea is +20 degrees and sunny! Can't wait!

p.s.   clara


Tuesday 23 April 2013

tasty tuesday : best apple dip ever. (it's got skor bits!)

This is simply put: the BEST apple dip ever. Seriously. This is a total crowd pleaser and ever since I first had it at my sister-in-law's place (who is a fantastic cook/baker!), I have been craving it and making it often. Sweet and simple, there's no way you'll regret making this dip!

{  i  n  g  r  e  d  i  e  n  t  s  }

lots and lots of fresh, crisp apples
1 package of cream cheese (250 grams)
1/2 cup of brown sugar
1/3 of Skor toffee bits

{  i  n  s  t  r  u  c  t  i  o  n  s  }
make sure your cream cheese is @ room temp, combine all your ingredients in a mixing bowl, and mix! then devour. 

And now, I'm going to go and eat some apples with this dip :) Cheers!

p.s.   clara 


Sunday 21 April 2013

{ happy first birthday to us! }


artwork by: miss clara!

I honestly cannot believe that it's been one year since we started this blog!  What a wild ride it's been. 
All three of us have grown so much in so many ways, and it makes me so proud to be able to look back a such a wonderful year full of mistakes, growth and so much fun.

We also want to say a huge thank you to YOU!  While we would still be baking, diy-ing, and taking pictures like crazy even if we didn't have any readers....having people interested in what we have to say makes blogging that much more special!  We love hearing your thoughts on anything we share, and I love connecting and following along with your blogs as well!


Oh ya, I totally baked birthday cakes for our blog!  I actually made cupcakes, and cut the tops off of two of them to form mini cakes....and I'm loving the resuts!


We can't wait for the coming year!  We're bursting with ideas, and are so excited to share them with you all!


p.s.   kelsey, clara and jordyn

Saturday 20 April 2013

outfit post: bye bye birdie


It's that time of year again.  When the birds start to sing, and the cherry blossom come out in full bloom.
At least it on the coast, sorry Clara!

A friend of mine living in the Okanagan said she was confused by the weather, because in this photo it looks like spring, yet she is still ankle deep in snow.
I told her, well this was after it rained, while it was sunny, and before it snowed that day.

The West Coast can be weird sometimes.


This is one of my favourite spring outfits!  The birds printed onto the lace are absolutely beautiful, and all the colours in it make it easy to match with things!


I can't wait until we have more consistent sunny weather, but right now I will take what I can get!

Also props to Kelsey for all these gorgeous photos!

p.s.   jordyn

Thursday 18 April 2013

watercolour diy: "love your city"

As you might remember from this watercolour diy, I am seriously in love with watercolours!
I've always loved all the "love your city" artwork that's all over etsy and pinterest, so I decided to put a watercolour spin on it and do one of good old Edmonton, Alberta. And yes, I'm well aware of how boringly shaped my province is, but hey what can ya do!

If you need any tips on how to use watercolour paint, make sure to check out my watercolour stencil art DIY for a list of helpful hints!
Supplies Needed:
watercolours, good paint brushes, watercolour paper, cup of water, tape, cut-out of your city, cut-out of a little heart, eraser, and a sharpie
Instructions

1. Print & cut out a map of your province / state / country.
2. Trace your map onto your watercolour paper.
3. Take your cut-out little heart and place it over the city where you live. 
4. Begin painting! I kept mine very simple and stuck with only yellow and a smidgen of orange to make an ombre effect. I picked yellow because Alberta's prairie fields turn golden =) 
5. Once your watercolours have dried, take an eraser and erase the lines from your tracing as much as you can.
6. Add a little note at the bottom with sharpie that says: "Home is where the heart is"


p.s. ♥ clara

Tuesday 16 April 2013

tasty tuesday: peanut butter pretzel bars


Remember the delicious Peanut Butter Bars I made in September?  Well they are back!  This time with a crunchy twist!


Peanut Butter Pretzel Bars
from:
Bakerlady

Ingredients:

Base:
1/4 cup melted butter
1 cup peanut butter
1/2 cup icing sugar
1 cup crushed pretzels (quite small, pea size crumbs)
1/2 cup graham cracker crumbs

Chocolate layer:
3/4 chocolate chips
2 Tbsp peanut butter

Directions:
1. Mix the butter, peanut butter and icing sugar in a medium bowl.  
2. Stir in the crushed pretzels and graham cracker crumbs.  
3. Press into a greased 8x8.  ( I lined mine with tin foil, so I could just lift it out and cut the bars!)
4. Chill for about half an hour.
5. Melt the chocolate chips and peanut butter together to make the topping.
6. When melted, spread evenly over the bottom layer.  Using an offset spatula works wonders, and if your chocolate is still a bit melty when you have finished spreading it, give your pan a bit of a shake, or gently bang it on a counter.  This will smooth out the chocolate even more.
7. Refrigerate for about an hour before serving.
8. Lift the bars out of the pan (with the tin foil).
9. Cut into squares!


I didn't think these bars could get any better, but I was so wrong!  
The pretzels take these bars to a whole new level.  Like with my Salted Caramel Pretzel Cookies, adding pretzels to baking may seem a little weird at first.  But I promise you, one bite of these bad boys, and you will be sold!


So do you have a girls night coming up?  A book club meeting?  A family dinner?  A haircut?
Use any excuse you want, please just make these!!

p.s.   jordyn

Related Posts Plugin for WordPress, Blogger...